One of the uses of AutoCAD is for organizing data, this data can be of any form. A line is a data form, asides it being a form of data it is also one of the tools in AutoCAD you can’t do without especially in 2D drawing, so let learn the LINE command, and gradually we learn how to draw.
A line is said to be universal as you will use the line for construction, you will use lines to find your right spot, and you will use lines in so many different ways. A line is defined as all the points between two specific points. It is also one of the easiest to draw in AutoCAD, with just two clicks of the mouse, specifying two different points you have drawn a line. Even though a line is very simplistic, there are many ways to drawing a line.
To start the LINE command you can go to one of several different places, you can use one of several different methods. One of which is the one below.
Drawing Lines in AutoCAD
METHOD 1
On the ribbon on the home tab, the first panel which is the draw panel, the first icon you have which is for the line command, click on it and your line command is started. Now, remember to follow your command prompts in your dynamic inputs and on the command line, they will tell you what you need to do.
The ribbon –> home tab –> draw panel (the first panel) –> the line icon (the first icon)
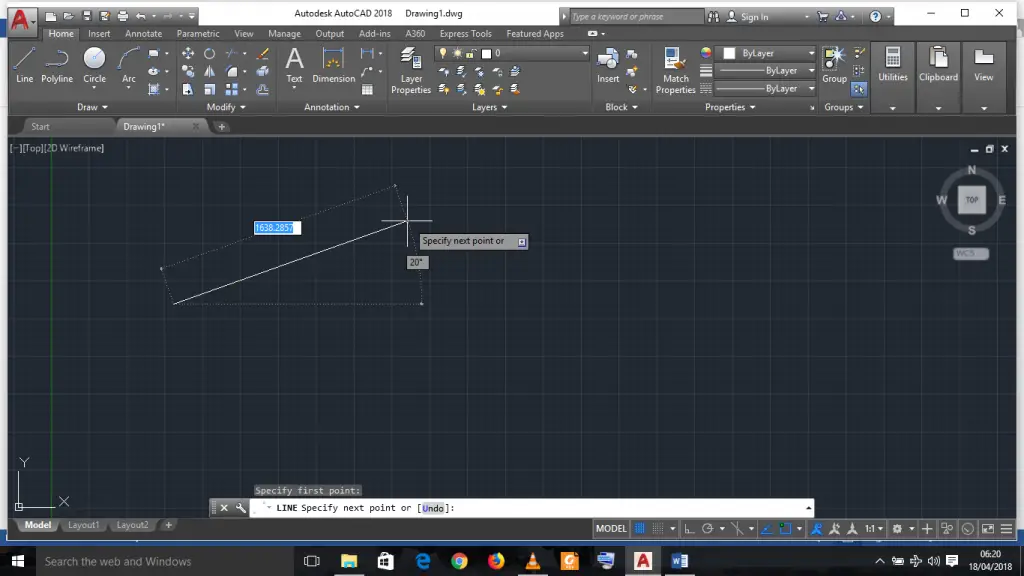
Obviously now we need to specify our first point, click anywhere. As you move your crosshairs you can see where the line is going to go, your dynamic input will give you information about the line such as the angle at which the line is being drawn, the length of the line. You can now click the second point, if you like to continue drawing, pick another point, and keep clicking until you finally decide to stop, press ENTER/ESC/ SPACE BAR/RIGHT CLICK THEN CLICK enter/cancel.

Now you’ve drawn your first LINE, which is the simplest way to draw a LINE.
Most of the time LINEs are not always arbitrary, you need to be specific in drawing your LINES. Starting drawings from scratch it is always very difficult to find where to start, I suggest you find the line that you can use and use it for the base of all other lines and you can proceed from there.
METHOD 2
You might want to be specific about your LINE instead of picking just any two points, you might want to use the ORTHOGONAL command, by pressing F8 you will see ortho on/off written on the command line, this command enables you to draw orthogonal LINES, i.e. LINES will be drawn either vertically upward/downward or horizontally to the right/left. You can also toggle on/off ortho mode by clicking on the ortho icon (the icon shows two lines at the right angle) on the status bar. The status bar is located at the base of the AutoCAD interface, which has a series of easy access commands/settings.
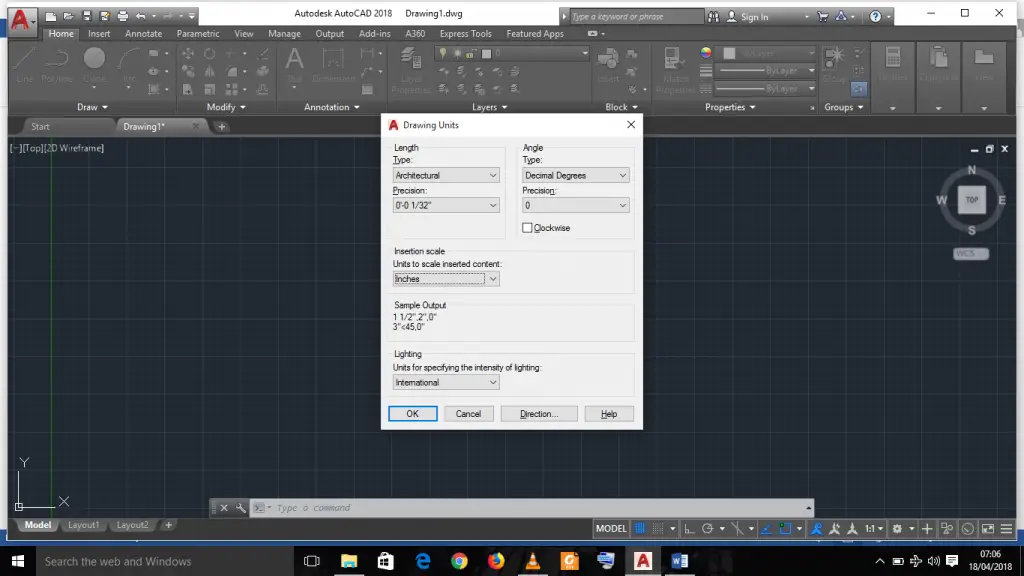
You might also want to be specific about the units in which you want AutoCAD to draw, so type the word units on your keyboard, press ENTER/SPACE BAR,
The units setting’s interface will open

You can set the units to your convenience, it will hasten your drawing. Set your units as shown above. Now we would be drawing in inches. Now you need to know basic conversions, 1 inch (written as 1”) =25mm, 1 foot (written as 1’) = 12 inches (written as 12”). So you might decide to draw 20 feet i.e. 20’* 12”= 240”, when inputting figures, you can decide to do the math and write in inches, or better still you can input 20’, AutoCAD will not only recognize it like 20 feet, it will also do the math.
If you decide to give a specification of say 50 feet 6 inches you can input it as 50’6 or 50’6” either way will be recognized by AutoCAD. Now, draw a line which starts from the origin. Let erase the already drawn line. There are different ways to go about erasing/deleting a data from AutoCAD, you can select objects individually by LEFT CLICKING on the objects and then press DELETE on your keyboard or better still type in ERASE on the keyboard, then press ENTER. You can also locate the erase icon on the ribbon in the modify tab. You can also do a group select, LEFT CLICK on the drawing area and drag the mouse towards the left over the objects to be erased, LEFT CLICK again and press DELETE on your keyboard.
Back to drawing a line from the origin. Selected the line command, or better still type in ‘L’ on your keyboard, AutoCAD will complete it for you and bring a drop down list given you all available settings and command that begins with ‘L’, as you complete the spelling, AutoCAD will narrow the drop-down list to your preferred command (this feature is for AutoCAD versions from 2010 above). Now type in LINE, press the SPACE BAR (in AutoCAD, the SPACE BAR is used for entering), your line command is now active.
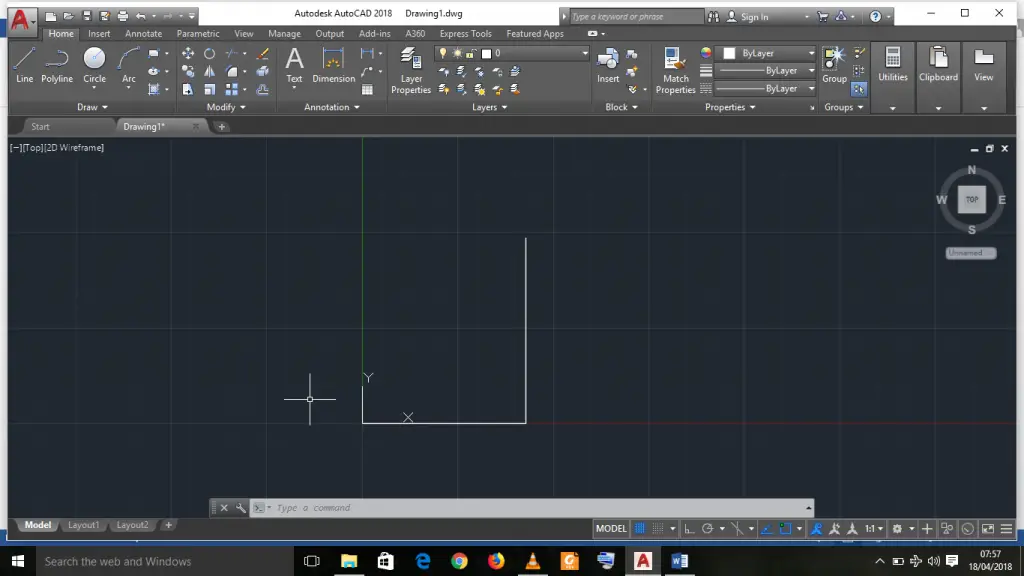
Type line on your keyboard –> press SPACE BAR –> specify the first point by inputting (0, 0) (remember we want to start our line from the origin) —> specify the next point by inputting (35, 9) (before specifying the next point let your crosshairs move to the right of the origin, this will let the line to be drawn to the right of the origin, likewise if you direct the crosshairs above the origin, it will make the line to be drawn upward, above the origin) —> press SPACE BAR/ENTER/RIGHT CLICK —>specify the next point, input (40’5) direct the crosshairs above the already drawn line —> press SPACE BAR —> press Esc (this will stop the line command)
you can ZOOM and pan using your mouse, to ZOOM use the scroll wheel, when you scroll up, you are ZOOMing in and vice versa. To PAN press hold the scroll wheel and move the mouse around. The pan and zoom command enables you to view the drawing and hidden details better.
Now lets PAN and ZOOM the just concluded exercise, Pan and ZOOM, centralizing your drawing.


