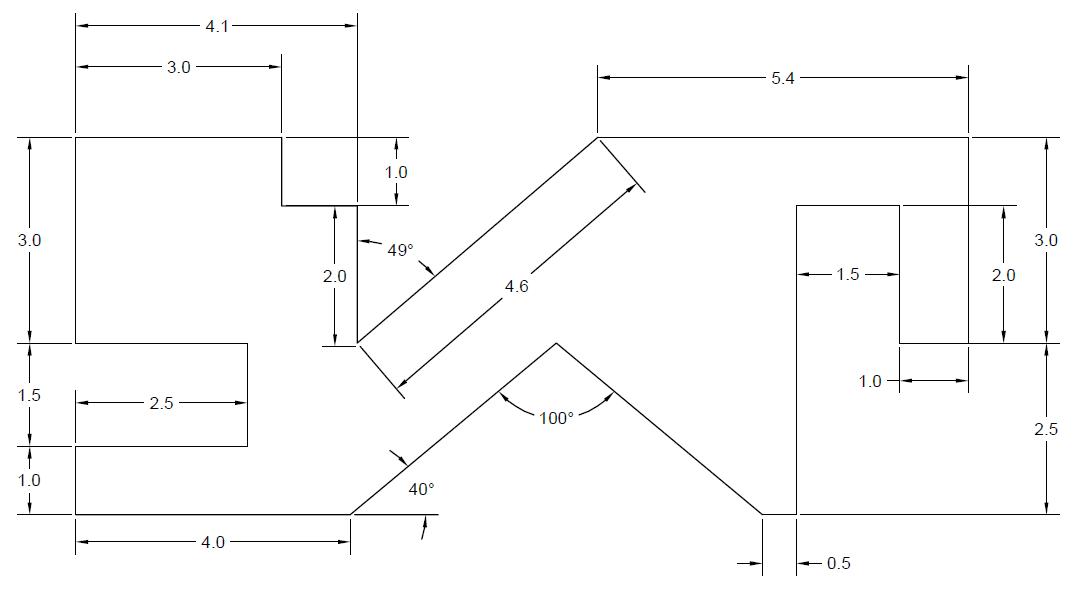
Welcome to Day #4 of this series of 2D AutoCAD exercises. We have a simple image to replicate using AutoCAD.
All dimensions are given.
If the drawing above is confusing, use the following one, where the image to draw is the one in the red color.
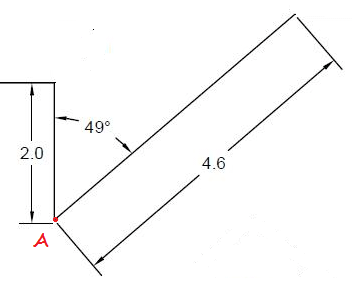
If you followed since Day #1, You should have no problem drawing this. However, the new part in this excercises consists of the place where you need to draw a line knowing its inclination and its distance. This is shown below:
In this figure, we have a line of length 4.6 and this same line is at an angle of 49 degrees with the another line of length 2.
To achieve this drawing with AutoCAD, you should first draw the line of length 2, which you should know how to do. Afterwards, start a new line at point A, type @4.6<41 and hit the ENTER key on your keyboard. The command is defined as 4.6 being the length and 41 being the angle in degrees.
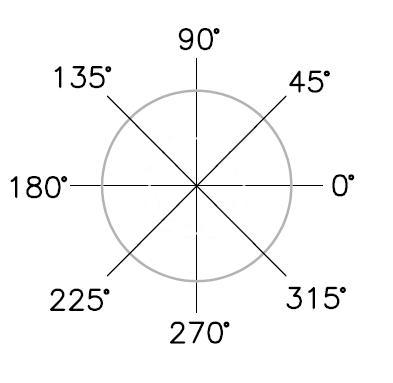
Are you wondering why 41 degrees when it is stated as 49 in the figure? AutoCAD counts angles in trigonometry form. Therefore, to find the right angle you must do the math, for example, 90 – 49 = 41.
In general, a figure is shown below on how AutoCAD counts angles.
This brings us to the end of today’s exercise, please like, share and comment.
See you on day #5 of learning AutoCAD.
[ws_table id=”3″]


Comments
9 responses to “20 Days of 2D AutoCAD exercises #4”
Hi, really appreciate if someone tell me how to draw the line without distance. Just Angle. Image uploaded.
Thankyou.
Maybe the CHAMFER command may be of use to you. You can see the tutorial at: https://www.computeraideddesignguide.com/20-days-of-2d-autocad-exercises-6/
Hope it helps.
Ok. Jason. Will try it soon. Thanks for your reply.
Start drawing the image from the top size and let that part be the last one you think of.
When you will have everything else on paper, it will be so easy to draw that part that will wonder how you did not think about it earlier.
So after drawing the top part, you will be left with that triangle. Notice that its third angle is 40 since in a triangle the sum of all angles is 180.
The length of the base of the triangle will be known since this is the only piece missing.
hope you see what I mean!
wish it helped.
3.8935
this design has problems with the final form you cant get the angles correct no matter what supposing that the 49 degree angle is the middle point the left side is slightly elevated compared to the right one if you guys have not noticed i don’t know what to say
Draw a Line from the first point on bottom left then type “<40", extrude past connecting point, press enter, Draw a second line and select the second point on the right "<140" (40+140=180) extrude past the first line you drew, then use the "Trim tool" on the Lines that past the angle. https://uploads.disquscdn.com/images/5bbf8544d2cee7106b2958766f231428f6d00b997d82e5420ba9bf4768619a78.jpg https://uploads.disquscdn.com/images/d951b01d9b635f4734487fce2523505cafa7012a74a52c76f7c057ba98244987.jpg https://uploads.disquscdn.com/images/a6f00511d3e2550673f3b5cbfcdccd9c0b80f803733d97738cbc7aef6bd70ff2.jpg
super site
That was not the aim of the exercise. The goal here is to have the user learn how to subtract/add angles and play with those angular features of AutoCAD. You have been very smart in noticing that elevation level you are bringing about here but that goes totally out context.
Noticing that or not does not affect your ability to have the drawing right and does not diminish what you are supposed to learn in this session.